The Iron Condor: Four Legs, One Income Trade
The Iron Condor: Four Legs, One Income Trade
The iron condor is the purest expression of range-bound trading. It doesn’t care about direction. It doesn’t need earnings to beat estimates or miss. It needs exactly one thing: the stock to close between two specific price levels at expiration. If it does, both spreads expire worthless and you keep the entire premium from all four legs.
It’s also one of the most widely discussed — and widely misunderstood — options strategies. This article cuts through the noise and gives you the mechanics, the real trade math, and the management rules you need to trade condors profitably.
What Is an Iron Condor?
An iron condor combines a bull put spread (below the market) and a bear call spread (above the market) on the same underlying, with the same expiration. You’re selling premium on both sides of the stock simultaneously.
The result is a position that generates income from a stock that stays range-bound — and has defined, capped losses if the stock breaks out in either direction.
Four legs of the trade:
Bull put spread:
  Sell 1x AAPL $165 Put  →  receive $2.10
  Buy  1x AAPL $160 Put  →  pay    $0.60

Bear call spread:
  Sell 1x AAPL $175 Call →  receive $2.10
  Buy  1x AAPL $180 Call →  pay    $0.60

Net credit: $2.10 + $2.10 − $0.60 − $0.60 = $3.00/share = $300 per condor
Four legs, one simultaneous order, one net credit.
The P&L Structure
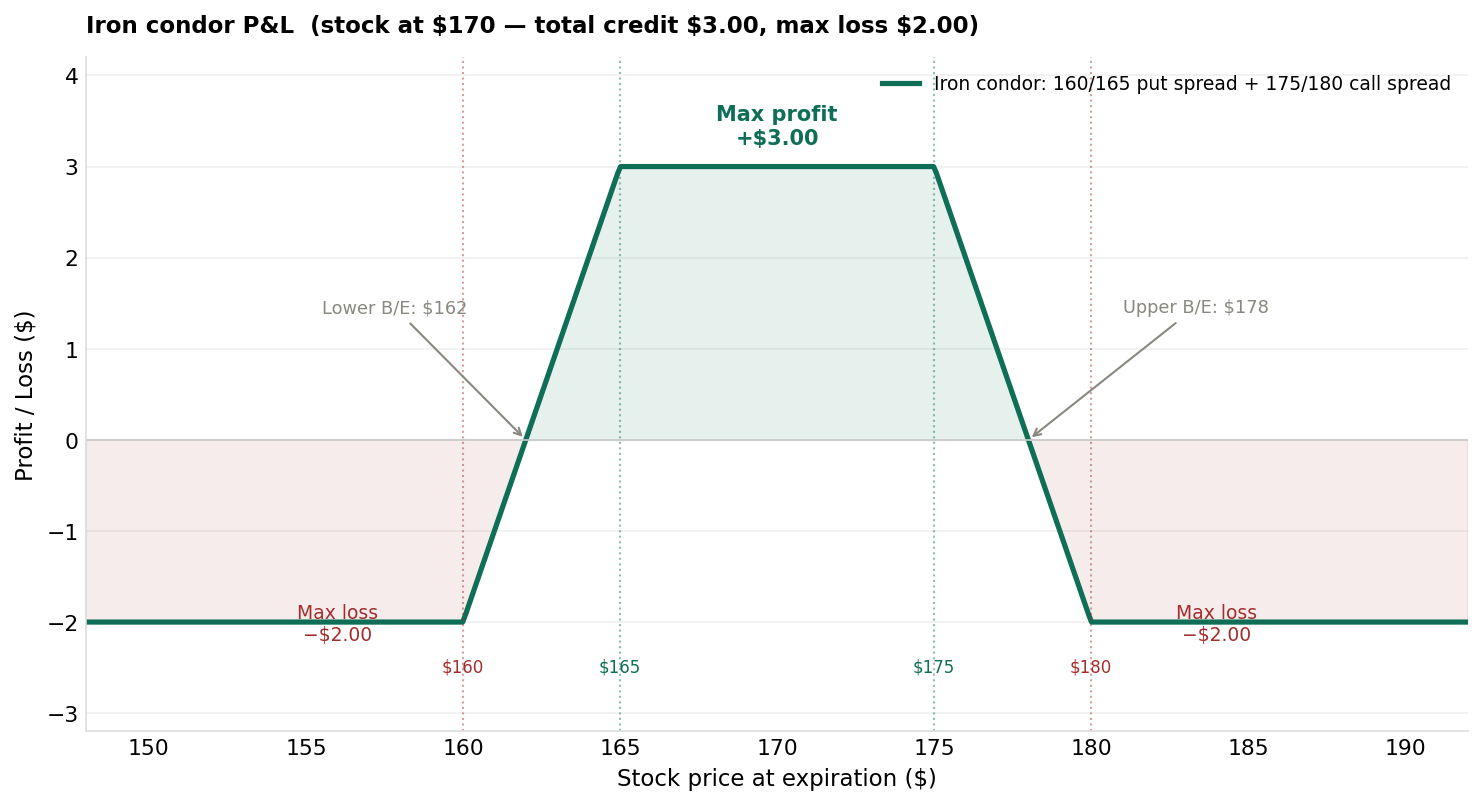 The iron condor delivers maximum profit ($3.00) if the stock stays between the short strikes ($165–$175). Both sides have equal max loss ($2.00), with break-evens at $162 and $178.
Four distinct zones at expiration:
| Zone | Stock Price | P&L |
|---|---|---|
| Below lower wing | < $160 | Max loss: −$2.00 (put spread at max loss, call spread worthless) |
| Between lower strikes | $160–$165 | Recovering: from −$2.00 toward breakeven |
| Profit zone (tent) | $165–$175 | Max profit: +$3.00 (both spreads expire worthless) |
| Between upper strikes | $175–$180 | Recovering: from +$3.00 toward breakeven |
| Above upper wing | > $180 | Max loss: −$2.00 (call spread at max loss, put spread worthless) |
Note on max loss: Unlike a naked short spread, only one side of an iron condor can reach maximum loss at any given price — the stock can’t be above $180 and below $160 simultaneously. This is why the condor’s total maximum loss equals the maximum loss of one spread plus the premium from the other (partially offsetting).
Key formulas:
Max profit = Total net credit = $3.00 ($300 per condor) Max loss = (Spread width − credit from threatened spread) + credit from safe spread’s max loss contribution — see the diagram Lower break-even = Short put strike − Total credit = $165 − $3.00 = $162.00 Upper break-even = Short call strike + Total credit = $175 + $3.00 = $178.00
When to Trade an Iron Condor
High IV environments are essential. Iron condors are short volatility trades — you’re selling both sides and collecting premium. In low-IV markets, premiums thin out and the risk/reward deteriorates. Check IV Rank before every condor:
- IVR > 50: Good candidate for condor selling
- IVR 30–50: Proceed with selectivity; tighten sizing
- IVR < 30: Low-premium environment; consider passing
Range-bound price action. A condor lives or dies by the stock staying within the profit tent. Stocks in well-established ranges (bouncing between support and resistance) are natural condor candidates. Trending stocks with momentum in one direction are generally poor fits — you need quiet, not conviction.
Avoid earnings. An iron condor held through an earnings announcement is a high-risk position. The gap move from earnings can instantly take the stock through one of your short strikes. Close condors before earnings or choose underlyings that have already reported.
Selecting Strikes for an Iron Condor
Professional condor traders typically use one of these approaches:
Delta-based: Sell both short strikes at the 0.15–0.25 delta. This gives each spread roughly a 75–85% probability of expiring worthless independently. The combined probability of staying in the range is lower — but the premium is meaningful.
Standard deviation-based: Place short strikes at ±1 standard deviation from the current stock price. Most options platforms will show this as the “expected move” range.
Technical levels: Align short strikes with support (put side) and resistance (call side). This combines statistical probability with market structure context.
For the condor in our example (AAPL at $170, short $165P and $175C):
- Short strikes are $5 above and below current price — roughly one standard deviation at 30 DTE with 25% IV
- This creates a $10 wide profit zone from $165 to $175
Managing the Condor: The Critical Skill
Iron condors rarely require management when things go right. When they go wrong, management is everything.
Target Exit: Close at 50% Max Profit
Sell a $3.00 credit? Target closing the entire condor for $1.50. Statistically, this maximizes risk-adjusted return over many trades by eliminating exposure during the riskiest final 21 days.
One Side Gets Tested: Manage Asymmetrically
If the stock moves toward one short strike, the entire condor doesn’t need to move — just address the threatened spread.
Adjustment 1: Roll the tested spread out in time. Close the threatened spread and reopen it in the next expiration cycle at the same or slightly adjusted strikes. If you can collect a credit on this roll, you’ve extended your time horizon for no additional cost. See Rolling Options for the full mechanics and decision framework.
Adjustment 2: Roll the untested spread toward center. If the call side is being tested, roll the put spread (untested) up — from $160/$165 to $163/$168, for example. This collects additional credit and tightens the overall condor. Only do this if you’re comfortable with the increased directional exposure on the put side.
Adjustment 3: Close the losing side. If the put spread has lost 2× the credit you received for it, close it. The call spread may still expire worthless. This takes a spread loss but salvages partial profit from the surviving side.
Full Loss: When to Just Close
If the stock has blown through both strikes of one spread, the condor is probably a full loss on one side. Close the condor, don’t hold hoping for reversal. The max loss is defined — accept it and redeploy.
The Greeks at Work in a Condor
Understanding the Greeks helps you interpret position behavior:
Theta (θ): Positive — you’re net short premium, so time passing helps you. The position gains value each day the stock stays quiet.
Vega (ν): Negative — rising IV hurts you, falling IV helps. A VIX spike after you enter will expand the option premiums and show a paper loss. This is why entering at high IVR (when IV is likely to mean-revert lower) gives you a vega tailwind.
Delta (Δ): Near zero initially — the position is market-neutral. As the stock moves toward one spread, that side’s short option gains delta (negative for the position) and the overall condor develops a directional bias.
Gamma (Γ): Negative — large, fast stock moves hurt you. This is why condors prefer quiet, range-bound stocks.
Iron Condor Trade Checklist
Before entering an iron condor, confirm:
- IV Rank above 40–50%
- Stock is range-bound, not in a strong trend
- No earnings within the position’s lifetime
- Short strikes at 0.15–0.25 delta each
- 30–45 DTE
- Position sized at ≤ 5% of portfolio at risk
- Exit plan defined: close at 50% profit, roll or cut at 2× loss on either spread
Key Takeaways
- An iron condor = bull put spread + bear call spread on the same stock and expiration — selling premium on both sides
- Max profit = total net credit (stock stays inside both short strikes at expiration)
- Max loss = one spread’s full loss partially offset by the other spread’s credit — fully capped
- Best in high IV environments (IVR > 40%) with range-bound, non-earnings stocks
- Target exit at 50% of max profit; manage the tested spread independently when the stock moves
- Monitor theta (your ally), vega (IV expansion is your enemy), and gamma (large moves hurt)
What’s Next
You’ve seen the condor’s structure — now understand what drives it: IV Rank and IV Percentile: Timing Your Premium Sales. Knowing whether IV is cheap or expensive before entering any spread or condor is one of the highest-leverage skills in options trading.
Iron condors are a four-leg order — and the platform matters. Tastytrade was designed around exactly this kind of trade, letting you enter the full condor as a single order with one net credit, and close or roll individual legs or the entire position with equal ease.
Disclosure: this is a referral link. If you sign up via this link, the site may earn a commission at no cost to you.
Disclaimer: This content is for educational and informational purposes only and does not constitute financial, investment, or trading advice. Options trading involves significant risk and is not suitable for all investors. You may lose the entire amount invested. Always conduct your own research and consult a licensed financial advisor before making investment decisions.